Sunday, 17 June 2012

Oven Cooked Pork and Fennel Risotto


This week I bought a coat... in June... JUNE. So excuse me while I share with you a recipe that isn’t particularly seasonal. I’ve been resorting back to my more wintery repertoire of warm and comforting suppers, as when the rain is driving against the window and wind is fluttering the roof tiles, I can think of nothing better then standing over a simmering pan for an hour or so. Of course, I’d love to be marinating copious amounts of meat in preparation for an upcoming barbecue, but this evening an oven cooked risotto seemed more appropriate. 

The first risotto I ever made was cooked in the oven rather then through the traditional method of adding stock slowly to the pan and stirring. I will admit that the traditional method does allow for little more control over the level of bite that you’re after, but when you want something that you can throw in the oven and forget about, then this is the risotto for you. 

Fennel and pork is a classic combination, and here I have coupled thin slices of fennel with both crumbled sausage meat, which adds texture and meatiness, and chunks of chorizo, which brings a punch of spice along with the Tabasco. Overall, the risotto is sweet and satisfying, with hints of aniseed, spice and porky-ness. If it’s not too naughty, or if you’re splitting the recipe to serve four rather then two, a wedge of crusty bread to mop up the sauce would be lovely. 

Serves 2 greedy people 
a splash of olive oil
4 sausages
1 fennel bulb, thinly sliced
1 red onion, peeled and finely chopped
2 garlic cloves, peeled and thinly sliced
3 sprigs of rosemary, chopped
a few drops of Tabasco
an inch or so of spicy chorizo sausage, chopped
150g arborio rice
large glass of white wine
roughly 200g of passata
250ml chicken stock 
  1. Preheat the oven to 180C. Heat the oil in a large pan that can go in the oven, and that has a lid. Remove the sausages from their skins and crumble the meat into the pan. Be sure not to allow the meat to burn. 
  2. Add the fennel, onion, garlic, two thirds of the rosemary, Tabasco and chorizo, stir and fry for about 5 minutes.
  3. Stir in the rice, then add the wine, passata and stock. Stir and bring the mixture to a boil.
  4. Put the lid on the pan, put it in the oven and cook for 20 minutes, until the liquid is absorbed and the rice is cooked through.
  5. Serve with a sprinkling of the remaining rosemary. 

Tuesday, 5 June 2012

Garlic Prawn Salad with Feta and Parsley


No blog silence apologies from me, suffice to say I finished my degree. Enough said. 

As Summer supposedly draws closer (I missed the mini heatwave due to aforementioned finished degree) thoughts inevitably turn to lighter dishes, fish, salads and picnics, that sort of thing. This dish ticks all the boxes, being light (but bready too to keep Ben full) and reminiscent of the smells and flavours you might expect to encounter outside a Spanish cafe. It’s really simple to make too, so would be a good option for feeding a crowd. 

My best cooking buddy Rose and I originally made a variation of this after trawling through my ever growing collection of cook books for something ‘light and prawny’. We were very pleased with the results, but felt it could do with some tweaking, namely the addition of  the wine, which I think adds a depth of flavour, and slightly less feta, which was a little overpowering to the delicate flavours of the rest of the dish first time round, although the more you add, the more deliciously creamy the sauce will be..

Serves 2
Pack of cooked and peeled King Prawns
Good wedge of butter
half a red chili, deseeded and finely chopped
2/3 garlic cloves, peeled and finely chopped
large handful fresh parsley, chopped
75g Feta, crumbled
juice of a lemon
a small glass of white wine
Salad leaves
some crusty bread
  1. Melt the butter in a saucepan and add the prawns, chili, garlic and parsley, before sprinkling over a little salt. Stir to coat the prawns.
  2. Add the lemon juice, wine and about half the feta, and leave to simmer for 10 to 15 minutes, stirring occasionally.
  3. Just before serving crumble in the remaining feta. 
  4. Serve on the salad leaves, pouring over all the delicious sauce, which can then be mopped up by the crusty bread.

Thursday, 17 May 2012

Gnocchi Bake, with Loads of Veg


I may have been off the blogging radar for a while, but I do have a pretty good excuse; I handed in my two dissertations on Monday. The culmination of a good two months of work, I can’t say I wasn’t happy to see them go, but now I have no excuse not to do revision for the exams I have in the coming weeks, which to me is a far less appealing prospect. Not to worry, it’ll all be over on the 1st of June, when regular blogging will resume. In the meantime, I’m not cooking that much, let alone blogging about new recipes, so you’ll have to make do with this delicious Gnocchi Bake, which has been my go to supper following a long day in the library. 


The origin of this recipe comes in the form of the Good Food website, but from these beginnings it has slowly evolved to include whatever I might have in the fridge, extra mozzarella, and as many different vegetables as is humanly possible to cram in a pyrex dish. 

And the results? Really tasty comfort food, with plenty of vegetables to make it healthy, and the same again of delicious pools of mozzarella to cancel all that out. 

Serves 2/4 (depending on greediness)
1 tbsp olive oil
500g pack of Gnocchi, cooked according to packet instructions
1 leek, sliced
a good handful of mushrooms, chopped small
1 onion, chopped small
2 garlic cloves, peeled and finely chopped
1 courgette, chopped small
1 carrot, chopped small
1 red pepper, deseeded and chopped small
400g tin chopped tomatoes
1 tsp dried oregano
handful of basil leaves, torn, plus more to garnish
1 ball of mozzarella, sliced
  1. Preheat the oven to 180C. Heat the oil in a large deep frying pan, then soften the onion, mushrooms, leeks and courgette. After around 5 minutes, add the carrot and pepper, and then the chopped tomatoes. Add the gnocchi and stir.
  2. Season, add the oregano, stir through the basil, and pour into an ovenproof dish. Push half the goats cheese into the mixture, and then scatter the rest on top. Bake in the oven for around 20 minutes, until the mozzarella is bubbling and golden.
  3. Serve with a scattering of basil leaves. 

Monday, 30 April 2012

Raspberry Layer Cake with Raspberry Swiss Meringue Buttercream


It was one of my best friend Maddy’s 22nd Birthday on Saturday, and I knew I just had to make her a cake to celebrate. I opted for a Raspberry Layer Cake with Raspberry Swiss Meringue Buttercream. I had made Swiss Meringue buttercream before, for Ben’s Rainbow Cake, and knew I had to try it again; it's honestly like eating a cloud. 


I weighed out the cake batter, splitting it three ways to make a slightly taller cake, and then sandwiched each layer with a little raspberry jam, the buttercream and a sprinkle of fresh raspberries. On top I plonked a good layer of buttercream, and then covered it entirely with fresh raspberries - mostly because it looked pretty, but also because my buttercream didn’t go exactly to plan. Last time I made swiss meringue buttercream with Rose it went perfectly, but this time it just didn’t really do its thing. First, it went a little soupy, so I popped it in the fridge, but then it went a little lumpy, so I whacked the KitchenAid up to high speed and hoped for the best. Unfortunately, it just didn’t come together, so I gave up, added a little seedless raspberry jam, and went with it. It tasted perfect, and that’s the most important thing, and once I’d added the fresh raspberries it looked pretty good. And so the Rustic Raspberry Layer Cake with Raspberry Swiss Meringue Buttercream was born. 

So much cake.
Fast forward to the party, and Maddy got to blow out the candles on not one but two Birthday cakes, her lovely boyfriend Tony bought a deliciously decadent brownie cheesecake from the Hummingbird Bakery. It was a fabulous night, filled with far too much cake and wine, so Thank You Maddy, and Happy Birthday once again!!


Adapted from Good Food
-For the Cake-
4 eggs
225g caster sugar
225g self raising flour
2 tsp baking powder
225g butter, at room temperature
Loads of fresh raspberries
1 tbsp raspberry jam 
  1. Preheat the oven to 180C. Grease and line the bottom of 3 20cm cake tine (if you only have two like me, you might have to do this in stages).
  2. Mix all the ingredients together until combined, but not over-mixed. It should drop off the spoon easily. 
  3. Divide the mixture between the tins. I did this by weighing the mixing bowl empty and then with the mixture. I minus-ed the bowl weight from the other weight and then divided by three. 
  4. Place the tins on the middle shelf of the oven and bake for about 25 minutes until the cakes are golden brown and coming away from the edge of the tin. Press gently to check they spring back.
  5. Leave in the tins for 5 minutes, then ease the cakes out with a palette knife. Cool on a wire rack, and make the buttercream (see below).
  6. Place one of the cooled cake on to a plate, spread over some jam, then buttercream, and sprinkle over some fresh raspberries. Repeat this process once more, and then on the top layer, just smooth over the buttercream, and cover with more fresh raspberries. 
Adapted from Whisk Kid 
-For the Buttercream-
300g caster sugar
7 egg whites
381g unsalted butter, at room temperature and cut into small cubes
1 tbsp seedless raspberry jam
  1. In a small saucepan, heat the egg whites and sugar, whisking constantly until the sugar is completely dissolved. To check this, rub some of the mixture between your fingers, it should be completely smooth.
  2. Pour into a bowl, a stand mixer works best, and whip on high speed. Then, on a low speed, add the butter, waiting until each piece is combined with the mixture before adding the next one. 
  3. Beat until the mixture is light and fluffy, then add the jam and beat to combine. 
If you have issues with your buttercream like I did on this occasion, check out Whisk Kids excellent guide to Swiss Meringue Buttercream HERE


Thursday, 19 April 2012

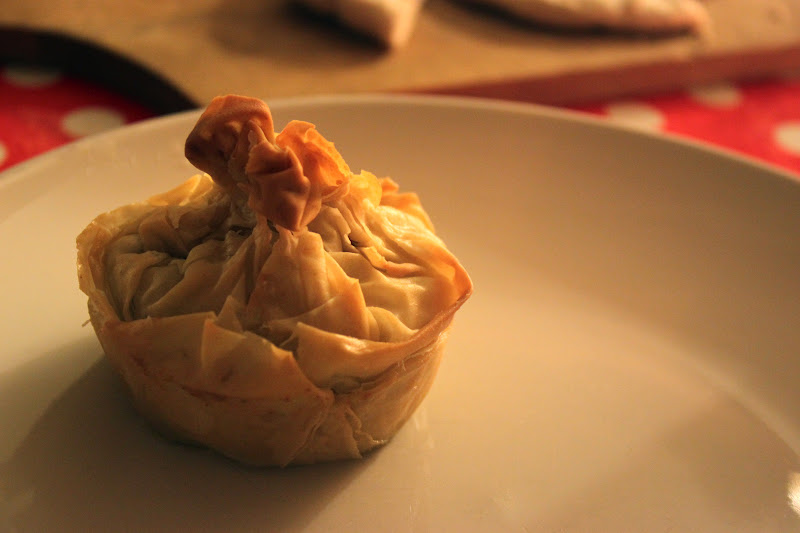
Mini Greek Style Spinach and Feta Pies


If you’ve been following the blog for a while you may have noticed that I have a pretty serious love for the Greek Islands. I love the landscape, the weather, the people and of course the food!! Deliciously simple and fresh, Greek cuisine echoes all the things I Iove about the country, and although I don’t think I’ll ever be able to recreate the feeling of sitting in a sun drenched taverna by the sea, I’ve done my best here. 


The day before I left to go home for the Easter holidays I had an epic cooking session, making the Marathon bars from a few posts back, a healthy seed filled brown loaf, as well as a huge Greek themed feast. This consisted of a starter of homemade tapenade and tzatziki with Mini Spinach and Feta Pies, followed by a main of Chicken Souvlaki and Herby Lemony fries, and finally a dessert of Baklava. Unfortunately I didn’t make it to the dessert, the first two courses were too filling for me that day!!
Chicken Souvlaki with Lemony Herby Fries


For the Spinach and Feta Pies I scouted around the internet searching for the general components of this Greek classic. Generally made into one big round pie, I decided to adapt the recipe to make more manageable mini pies, that wouldn’t look out of place at a dinner party. These pies are hugely simple to make and although the filling is made up of only three ingredients, they are fabulously tasty. Sometimes simple really is best!! 

Makes 4 mini pies
150g spinach leaves
100g feta cheese, crumbled
1 egg, beaten
approx. 1/2 250g pack filo pastry
  1. First prepare the spinach by wilting in a large pan with a couple tablespoons of water. Leave to cool in a sieve before roughly chopping. Place in bowl with the cheese and beaten egg, and mix well.
  2. Unroll the pastry carefully, and cut length ways down the middle, and then into squares (approximately six per sheet, they should be about 15cm square). Brush each square liberally with olive oil. Drape oil side down into the muffin tin compartments (I used four compartments spaced away from one another to ensure there wasn’t overlap), push the pastry down carefully so that they line each compartment, and then repeat the process until you have 3 or 4 layers of pastry in each compartment. Spoon over the filling, and then place one further square of pastry on top. Pull the pastry up around the filling, and scrunch together to make a pie. Brush the tops with a little more oil.
  3. Heat oven to 180C. Cook the pies for around 30 mins until the pastry is crispy and golden. Serve with salad and tzatziki. 

Monday, 16 April 2012

Whole Sea Bass with Roasted Fennel and Salsa Verde


Yesterday, Ben ran 26.2 miles for Hope and Homes for Children. So far he has raised £351.20, much more then expected, and he is a very happy, if a little sore, boy. I am a very proud girlfriend too!! As a big well done I decided to cook one of Ben’s favourites, Sea Bass. 

The inspiration for this dish comes from the Circus Cafe and Restaurant in Bath, where I have worked as a waitress off and on for around 4 years now. They serve a fish special each day, and over Easter one such special was fillets of Sea Bass served with Salsa Verde and Roasted Fennel. I decided to recreate this deliciously fresh and tasty flavour combination, baking the fish with fennel, black olives and lemon, before drizzling over my take on the herby and slightly acidic Salsa Verde.

-For the Fish and Roasted Fennel-
2 small sea bass, descaled and gutted by the fish monger, and rinsed and dried
1 fennel bulb, sliced
a handful of black pitted olives 
1 lemon, sliced
a handful of fresh basil leaves 
Seasoning
Olive oil, to drizzle
-For the Salsa Verde-
large handful of flat leaf parsley
large handful of basil
tbsp capers
6 anchovy fillets
clove garlic, peeled and chopped
tbsp lemon juice
dessert spoonful of white wine vinegar
large glug of olive oil
  1. Preheat the oven to 200C. Stuff the sea bass with half the sliced fennel, lemon, and some of the basil. Scatter the rest of the ingredients in a roasting tin, then place the fish on top. Season the fish with salt and pepper and drizzle over some olive oil. 
  2. Bake for around 30 minutes, until the fish are cooked through and starting to brown. 
  3. Whilst the fish is cooking, make the Salsa Verde. Chop large handfuls of parsley and basil, add the capers, anchovy fillets, lemon juice, garlic and white wine vinegar. Add a large glug of olive oil, and blitz to make a sauce (alternatively, if you do not have a mixer you can chop everything up finely and mix by hand to make a coarser salsa verde).
  4. Serve the fish, fennel, olives and lemon on a plate, and drizzle over the salsa verde. 

Saturday, 14 April 2012

Marathon Bars


So, firstly for a little blog upkeep. I have been a terrible blogger over the Easter holidays, but I hope that you all had a most wonderful time over the the last few weeks. This year I partook in not a single bit of Easter cooking, and I blame my blogging silence entirely on being home and waitressing. 

However, before I left for home I did manage to leave Ben some carb ridden treats to keep him going in my absence. The Brighton marathon is very nearly upon us, tomorrow in fact, and Ben has been consuming an insane amount of calories (this evening he ate a steak the size of my face, a copious amount of potato, and still has porridge to go before bed time). I decided to make him some nutty oaty bars, or as I like to call them Marathon Bars, to help keep his energy up during long training sessions. These bars are crammed full of tasty nuts, seeds and dried fruit, providing all the right vitamins and nutrients for those with the most active of lifestyles, and they taste very tasty too. 

Seems like I might be making a lot more of these bars in the future, as I too have caught the exercising bug, I now go to the gym (Shock Horror). Any excuse to eat more baked goods!!


175g honey
100g soft brown sugar
100g crunchy peanut butter
125ml sunflower oil
150g porridge oats
75g dries blueberries
60g mixed seeds
50g peanuts
  1. Line a square tin with baking parchment and preheat the oven to 160C.
  2. Warm the sugar, honey, peanut butter and oil in a pan, stirring constantly until combined.
  3. Mix all the remaining ingredients together in a bowl, and pour over the honey mixture, stirring well.
  4. Press into the tin and bake for around 25 minutes until the top is turning golden. 
  5. Cut into bars whilst still in the tin, leave to cool completely, and then turn out and slice.
Thought it might be worth adding the link of Ben’s JustGiving page to the end of this very much marathon related post. Ben is raising as much as he can for the brilliant UK based charity Hope and Homes for Children, which moves children out of orphanages and institutions in Central and Eastern Europe and into the loving support of a family. If you could make any donation at all it would be most appreciated. Visit Ben’s page here. THANK YOU!!
Related Posts Plugin for WordPress, Blogger...